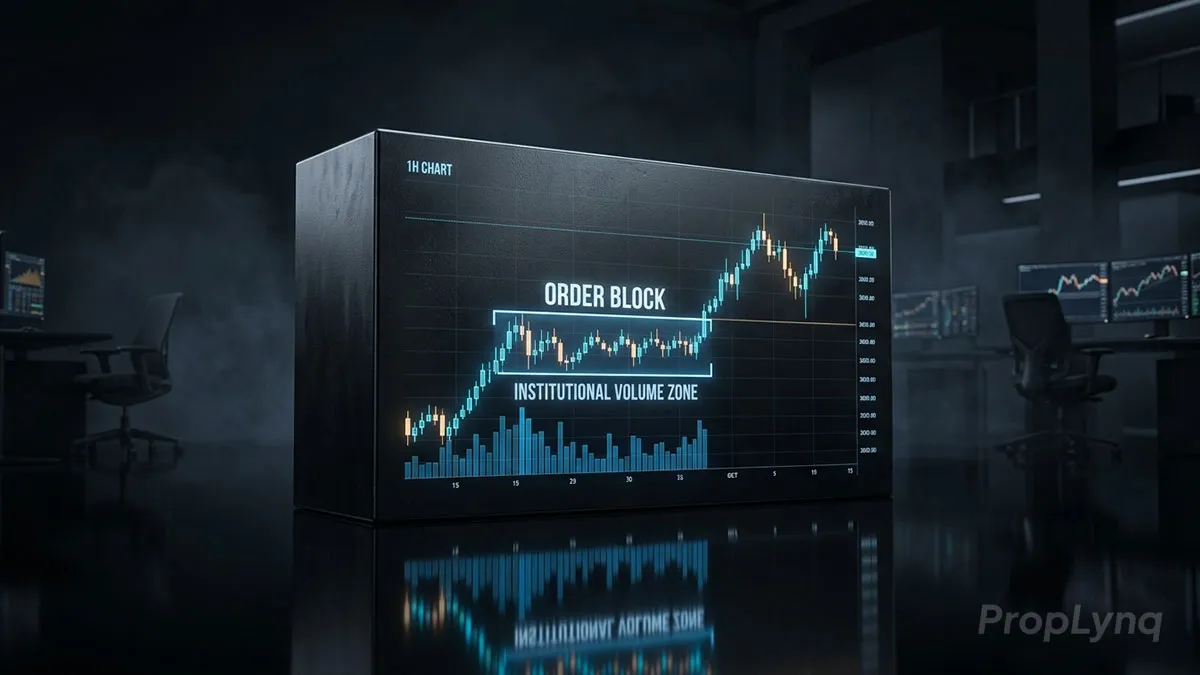
What Is an Order Block in Trading?
You mark a bullish order block on EURUSD. Price retraces, taps your zone an hour later. You enter long. Price drops 70 pips straight through it like the zone wasn’t there.
The order block wasn’t wrong. You marked the wrong candle.
This is the mistake most traders make — not misunderstanding what an order block is conceptually, but misidentifying which candle actually qualifies as one. They mark a broad area that looks like consolidation and call it an order block. They’ve read the definition. They know it’s where “smart money entered.” But the definition without the precision is almost useless in practice — it just moves you from guessing at random zones to guessing at slightly smaller ones. Understanding what an order block is versus where one might be is what separates profitable application from expensive approximation.
This article is about the precision: what exactly makes a candle an order block, how to find the right one every time, and what to do with it once you do.
The One Mistake That Makes Order Block Trades Fail
Most order block trades fail at the identification stage, not the execution stage.
Traders encounter order blocks through smart money concepts (SMC) or ICT content and walk away thinking an order block is another name for a supply or demand zone — a broad area where price once consolidated before a major move. So they mark consolidation ranges. They mark old highs and lows. They mark anything that looks like it could have been where institutions were active. Then they wait for a touch.
Sometimes it works. Often it doesn’t. And because the identification was loose to begin with, there’s no reliable way to distinguish a legitimate order block setup from a random coincidence.
The concept of an order block is more specific than that, and the specificity is everything. An order block isn’t an area. It’s a candle — the last candle moving against the subsequent direction before a confirmed, structure-breaking impulse. Miss that specificity and you’re not trading order blocks. You’re trading rough approximations of where order blocks might be, with all the inconsistency that comes with it.
What an Order Block Actually Is
An order block is the last opposing candle before a significant, structure-breaking price impulse. That definition is precise, and every word in it matters.
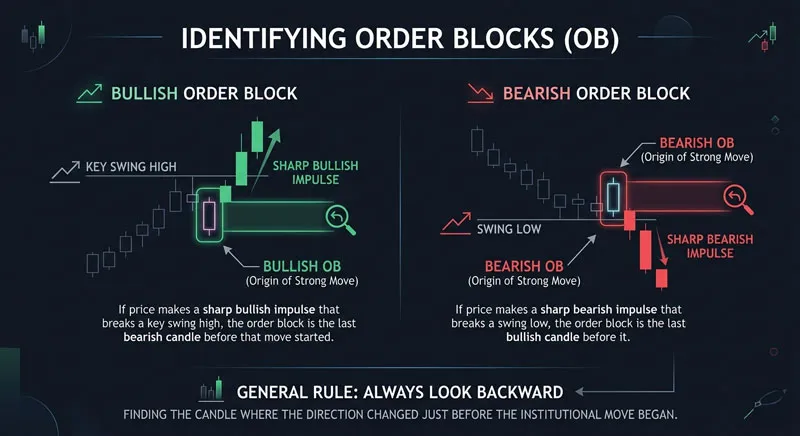
If price makes a sharp bullish impulse that breaks a key swing high, the order block is the last bearish candle before that move started. If price makes a sharp bearish impulse that breaks a swing low, the order block is the last bullish candle before it. You always look backward — finding the candle where the direction changed just before the institutional move began.
The logic comes from how large institutions actually fill orders. A hedge fund or central bank placing a $400 million buy order on a currency pair cannot fill at a single price. The order gets distributed across multiple levels — often through what appears as bearish selling on the chart — before the real bullish direction takes over and price surges. Those apparent sell orders are actually disguised accumulation. The last bearish candle before the bullish surge is the final round of that distribution. It’s the institutional fingerprint left on the chart.
When price returns to that order block zone later, the reaction comes from unfilled orders still sitting at those levels — institutional memory, if you want to call it that. This is why untested order blocks carry significantly more weight than zones price has already returned to and passed through. Once the institutional orders at that level have been absorbed, the order block loses its structural significance.
The zone boundaries of an order block are defined by the high and low of that specific candle, or a small cluster of consecutive candles moving in the same opposing direction immediately before the impulse — never a wide consolidation range.
Bullish Order Blocks vs Bearish Order Blocks
Both types follow the same structural logic. They’re mirrored versions of the same concept.
Bullish order block: The last bearish (red/down) candle before a bullish impulse that breaks structure to the upside. When price returns to this order block zone on a pullback, traders watch for long entries.
Bearish order block: The last bullish (green/up) candle before a bearish impulse that breaks structure to the downside. When price returns to this order block zone on a rally, traders watch for short entries.
Here’s how this plays out in practice. Marcus is trading EURUSD on the 1-hour chart. Price has been ranging, then makes a sudden 45-pip bullish move, breaking cleanly through a prior swing high at 1.0860. He looks back at the candles before that breakout. Immediately before the surge, he finds a clean bearish candle: open at 1.0824, close at 1.0812. That candle is his bullish OB. His OB zone: 1.0812–1.0824.
Price rallies to 1.0892, then begins pulling back. As it retraces toward the 1.0820 area, Marcus is watching — not because 1.0820 is generally “near support,” but because that specific candle is where institutional buy orders were layered before the move. There may be unfilled interest waiting there still.
The bearish OB works identically in reverse. If price had instead dropped 45 pips from 1.0860, breaking a prior swing low, Marcus would mark the last bullish candle before that drop as his bearish OB — watching for it to act as resistance when price rallies back into it.
Order Block vs Supply and Demand Zone — The Difference Matters
These two concepts are related, but they are not the same — and treating them as synonyms produces measurably worse trade quality. Methodologies like RTM trading, which also works from price-action zones, make the same distinction internally: a raw zone and a precisely defined OB candle carry different structural weight and produce different stop-loss calculations.
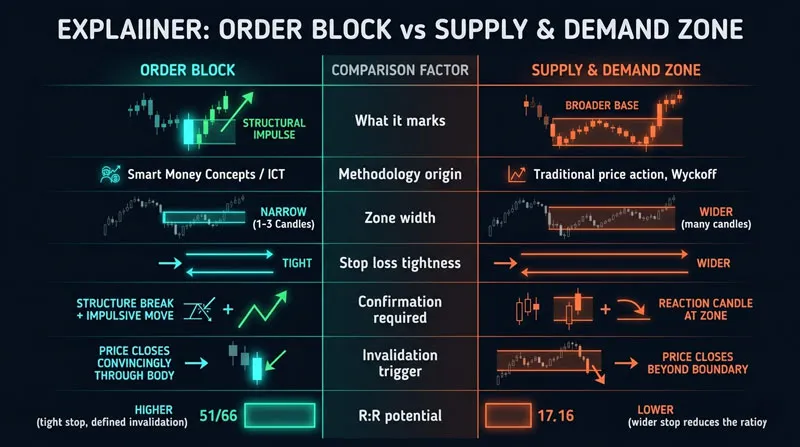
| Factor | Order Block | Supply & Demand Zone |
|---|---|---|
| What it marks | The specific last opposing candle before a structural impulse | A broader consolidation base before a significant move |
| Methodology origin | Smart Money Concepts / ICT | Traditional price action, Wyckoff |
| Zone width | Narrow — one to three candles | Wider — can span many candles |
| Stop loss tightness | Tight — just beyond the candle high or low | Wider — below or above the full zone |
| Confirmation required | Structure break + impulsive move | Reaction candle at the zone |
| Invalidation trigger | Price closes convincingly through the candle body | Price closes beyond the zone boundary |
| R:R potential | Higher (tight stop, defined invalidation) | Lower (wider stop reduces the ratio) |
The practical difference is the stop. A genuine OB entry puts your stop just below the candle low (for a long) or just above the candle high (for a short) — often 10–18 pips on a major forex pair. A supply and demand zone entry needs a wider stop to survive the noise inside a larger consolidation range, sometimes 30–45 pips for a comparable setup.
Same general area on the chart. Completely different risk profile. The OB gives you mechanically defined boundaries; the supply and demand zone does not. That gap in stop width directly affects your risk-to-reward ratio and, in funded trading environments, how much of your drawdown buffer you consume per trade.
How to Identify a Valid Order Block
Not every last opposing candle qualifies as a valid order block. Run every candidate through these five filters before marking it as tradeable. If you’re charting on a platform like TradingView, the TradingView setup guide for prop traders covers how to structure your chart layout cleanly so structural context is visible without indicator clutter — which matters when you’re trying to spot OB candles quickly.
1. A confirmed structure break must follow. The impulse after the candle must break a meaningful prior swing high or swing low. A modest pip move that retraces immediately is noise, not an impulse. The market needs to have made a clear shift in structure — a break that traders would agree is significant on that timeframe.
2. The candle must have a defined body. Order blocks require a candle with a real directional body. Dojis, inside bars, and spinning tops don’t qualify — there’s no clear commitment to a direction, so the institutional logic of “disguised accumulation or distribution” doesn’t hold. A clean body shows direction, even if that direction was misdirection.
3. The order block must be unmitigated. If price has already returned to and traded through the OB zone once since it formed, the institutional interest at that level has likely been absorbed. Entering on a second or third touch as though the OB is still fresh is one of the most consistent ways to take losses in this methodology. Mark mitigation status on every OB you draw.
4. Higher timeframe alignment is non-negotiable. A bullish OB on the 15-minute chart inside a clear daily downtrend is a countertrend trade. It might produce a short-term reaction. It rarely produces meaningful follow-through. The higher timeframe bias should support the direction you’re taking at the lower timeframe OB. When HTF and LTF align, probability improves substantially.
5. The impulse should leave a Fair Value Gap. The strongest order blocks are followed by impulses strong enough to leave a price imbalance — a gap between candles that was never properly traded in both directions. This gap, often called a Fair Value Gap or FVG in SMC methodology, confirms that institutional participation drove the move. Order blocks without a subsequent imbalance can still be valid, but they’re lower conviction than those paired with one.
Entries, Stops, and Targets When Trading Order Blocks
Back to Marcus. He’s marked his bullish OB at 1.0812–1.0824 on EURUSD. Price has extended to 1.0892 and is now pulling back.
Price reaches 1.0818 — inside the OB zone. On the 15-minute chart, a bullish engulfing candle forms with a close at 1.0822. Marcus enters long at 1.0822. His stop goes at 1.0806 — four pips below the OB low, giving the zone marginal breathing room while keeping invalidation tight. His targets: the prior swing high that was broken at 1.0860, and the structural high at 1.0892.
Risk: 16 pips. Target 1: 38 pips (approximately 1:2.4 R:R). Target 2: 70 pips (approximately 1:4.4 R:R).
The stop logic is not arbitrary. It’s not “20 pips because that feels right.” It sits precisely where the OB premise is definitively broken — where the candle that gave the trade its rationale is no longer structurally intact. This is the mechanical clarity that proper OB identification gives you, and it’s what makes the concept worth the learning curve.
Many traders also use pending limit orders placed at the OB level in advance rather than watching for a manual entry — setting a buy limit at the top of the OB zone and letting the platform execute if price taps it. On fast-moving retracements, this removes the hesitation that causes missed entries. Factor in that slippage at entry can shift your effective stop distance slightly on volatile pairs — build a small buffer into your risk calculation when executing on news-driven retracements.
For entry style, two legitimate approaches exist:
- Aggressive entry: Enter at the first touch of the OB zone, before a confirmation candle forms. You get the best possible price but accept more initial heat before the setup confirms itself.
- Conservative entry: Wait for a rejection candle — bullish engulfing, hammer, pin bar — to form within the OB before entering. You sacrifice a few pips of entry in exchange for visible evidence that price is actually responding at the level.
Aggressive entries produce better R:R numbers. Conservative entries produce fewer false starts. In practice, many experienced SMC traders scale in — a partial entry at the touch, a second addition on the confirmation candle — to capture some of both.
Order Blocks and Prop Trading: Why Precision Pays
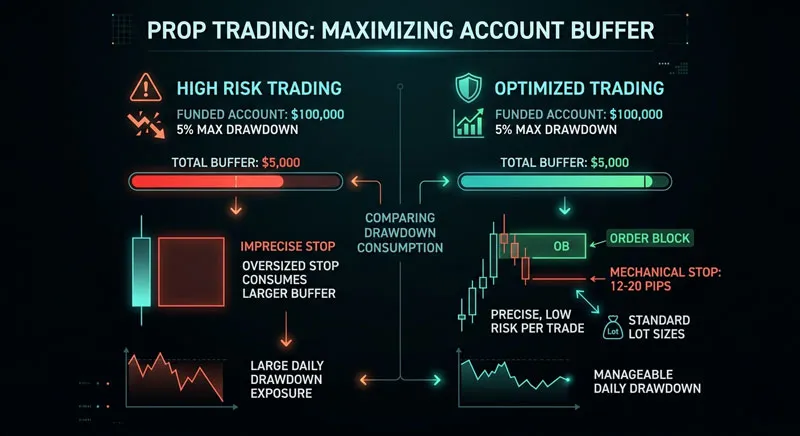
The structural advantage of OB trading in funded account environments comes down to one thing: tight, mechanical stops.
In prop trading, drawdown is a hard constraint. A $100,000 funded account with a 5% maximum drawdown gives you $5,000 of total buffer across the account’s life. Every trade with an imprecise, oversized stop consumes a larger fraction of that buffer unnecessarily. A properly identified OB gives you a mechanically defined stop — often 12–20 pips on a major forex pair — which means your risk per trade remains low even at standard lot sizes, and your daily drawdown exposure stays manageable.
PropLynq, for example, structures its evaluation challenge around both daily and maximum drawdown thresholds designed to reward controlled, consistent execution over aggressive swings. A trader entering on a valid OB with a 15-pip stop is using a small, defined fraction of their daily allowance on any single position. That leaves room to take multiple setups across a session, absorb an occasional loser, and still remain within the parameters needed to pass evaluation. Traders exploring what that process looks like end-to-end can read about how to get a funded trading account and what evaluation structure to expect.
This is the real reason order blocks appeal to serious prop firm traders. Not because the concept is theoretical, but because precise entry methodology produces tight stops — and tight stops are directly compatible with the risk architecture that funded trading demands. Wide, imprecise zones produce wide stops. Wide stops don’t survive prop firm drawdown limits for long.
Why Your Order Block Trades Keep Failing
If you’re applying order blocks and getting inconsistent results, the problem is almost always one of these four things.
You’re marking the wrong candle. The most common failure. Traders mark the candle that looks most significant — the dramatic reversal candle, the big bearish body in the middle of a move — rather than the structural last opposing candle before the impulse. The OB is the last candle before the move, not the most visually impressive one nearby. These are often different candles. FOMO plays a direct role here: the urgency to enter a running move pushes traders to mark whichever candle rationalises the trade they’ve already decided to take, rather than the structurally correct one.
You’re trading a mitigated order block. If price has already returned to your zone once since formation and traded through it, the institutional orders sitting there have been absorbed. Entering on a second or third touch as though the OB is still fresh is one of the most consistent ways to take losses in this methodology. Mark mitigation status on every OB you draw.
You’re ignoring the higher timeframe. A 15-minute bullish OB during a clear daily downtrend isn’t a high-probability long. It might produce a short-term reaction. It rarely produces meaningful follow-through. Knowing your macro bias before dropping to lower timeframe OB entries isn’t optional — it’s the context that determines whether your setup has wind behind it or is fighting the current. When a valid OB does get stopped out by continuation pressure, the instinct to immediately re-enter in the same direction is one of the fastest ways to blow a funded account — a pattern covered in detail in this breakdown of revenge trading after a loss.
There was no real structure break. If the impulse following your supposed OB didn’t actually break meaningful market structure — if it was just a swing in a ranging environment — there was no valid institutional impulse to define the OB in the first place. No structure break, no valid OB setup. This single filter eliminates a large percentage of the candidates that look plausible on first glance but have no structural backing.
Order blocks are precise by design. The precision is the feature. A correctly identified OB gives you a tight stop, a clear reason for that stop, and a defined point at which the trade is simply wrong. Get the four filters right — the right candle, unmitigated, HTF alignment, structure confirmed — and the concept stops feeling like guesswork.
Traders ready to put OB strategies to work in a live funded environment can get a funded account and test their execution under real prop firm conditions.
Miles Rowan Keene
As Senior Market Strategist at PropLynq, I write about market structure, trading psychology, and risk-first execution. My focus is on turning complex market behavior into clear, actionable lessons for both developing and experienced traders. I specialize in educational content covering funded account rules, drawdown management, trade planning, and strategy refinement, with the goal of helping traders build consistency through discipline, preparation, and a deeper understanding of how professional trading environments operate.
Weekly Trading Insights
Market analysis and trading tips delivered every Monday. No spam, unsubscribe anytime.
Comments
All comments are reviewed before publication · Text only · No links
No comments yet — be the first.